Amending Your Hikvision Smart Events
Hikvision Smart Events
The Hikvision Gen 2 cameras have advanced motion detection inbuilt to heavily reduce false events unlike other cameras on the market. Although the technology is extremely accurate, it is not always perfect straight away and may need some minor adjustments. Below is a step by step guide on how to adjust these events to ensure that you are not getting false alerts, but are still getting the genuine events. Please note, if the lights are coming on and the notifications aren’t coming through to your phone, your phone settings are causing likely the issue.
If you have a TV/Monitor connected to your NVR V4
Firstly, you will need to access the events:
- Right click and select (1.)System (2.)Event, (3.)Smart Event, (4.) the camera that is causing the issue
- You will need to either select Line Crossing or Intrusion depending on which event has been configured.
If you have a TV/Monitor connected to your NVR V5
To adjust your events,
- Open the event centre
- Event configuration
- ^^^^
- Perimeter Protection
- Select your camera, adjust your line crossings OR intrusion zones.
(Don't bother with region entrance or exiting)
If you do not have a TV/Monitor connected to your NVR
- Download the SADP software on your computer (this can be found on the Hikvision website)
- You will see your NVR on your online device list, you will need to make note of the IPv4 address
- Enter the IP address into into your web browser and login using your normal NVR login details
- Once you have logged in, you will need to go to (1.)Configuration, (2.)Event, (3.)Smart Event, (4.) the camera and event type (Line Crossing or Intrusion)
If you do not have a TV/Monitor connected to your NVR
- Download the SADP software on your computer (this can be found on the Hikvision website)
- You will see your NVR on your online device list, you will need to make note of the IPv4 address
- Enter the IP address into into your web browser and login using your normal NVR login details
- Once you have logged in, you will need to go to (1.)Event Centre, (2.)Event Config, (3.)Perimeter Protection, (4.) Select Camera. (5.) Select Intrusion (Line crossing or Intrusion detection)
If You Have Many False Alerts Notifications
- Ensure the area is drawn in the correct location, if you want to make changes you can click clear and redraw by clicking draw area. To draw the area, click once once on each corner.
- Make sure that the minimum (yellow box pictured on the monitor) and maximum (red box pictured on the monitor) sized objects are drawn and are the correct size. If the minimum box is too small, it can pick up smaller objects (e.g leaves, cats etc.). If you wish to redraw, click the min size box and click and drag on the image until the box is the correct size.
- On line crossings, ensure the direction is set correctly
- On intrusions, we generally recommend a threshold of 2 seconds however you can change this to suit. The threshold is the time the object must be in the area before it will trigger an event.
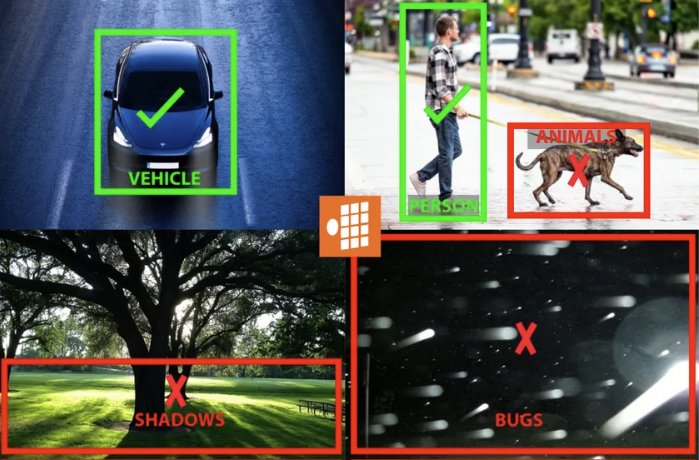
- The next step is to ensure the target is set to human and/or vehicle
- Following this, you will need to decrease the sensitivity. We recommend decreasing the sensitivity in increments of 10% as you do not want to start missing events.
- If all of the above has been completed, select arming area/virtual plane 2 to see if there is a second area that is active on the event.
If You Are Not Getting Any Notifications and the Lights Are Not Coming On
- Ensure the cameras have been armed using your phone app
- Ensure the area is drawn in the correct location
- Make sure that the minimum (yellow box on the monitor) and maximum (red box on the monitor) sized objects are drawn and are the correct size. If the minimum box is too big or the maximum box is too small it will not pick up on the objects.
- On line crossings, ensure the direction is set correctly
- On intrusions, we generally recommend a threshold of 2 seconds.
- The next step is to ensure the target is set to human and/or vehicle
- Following this you can increase the sensitivity. We recommend increasing the sensitivity in increments of 10% as you do not want to start getting flooded with alerts.
Adjusting Your White Light
Click the button below to adjust the white light on your ColorVU cameras. The white light can be set to switch on once the Smart Events you have drawn has been triggered.